Goals:
- Understand the benefits of an automated version control system.
- Understand the basics of how Git works.
- Make a repository available online.
- Clone and modified a public repository.
We’ll start by exploring how version control can be used to keep track of what one person did and when. But even if you aren’t collaborating with other people, automated version control can help you to keep track of changes you make on a report for your class, a manuscript for publication or even some scripts for your research; many journals ask you to have your codes available when submiting your manuscript.

“Piled Higher and Deeper” by Jorge Cham, http://www.phdcomics.com
Setting up git in hoffman
First you will need to launch a terminal and login into your hoffman account.
On the command above, change c177-t0 with your username. You will be ask to enter your password.
$ ssh c177-t0@hoffman2.idre.ucla.edu
[c177-t0@login1 ~]$
Once login, make sure you are in your home directory. To get your current working directory type from the terminal:
[c177-t0@login2 ~]$ pwd
/u/home/class/c177/c177-t0
*Note: your path should be similar but instead of c177-t0 you should
have your username.
Let’s start an interactive session.
[c177-t0@login1 ~]$ qrsh
JSV: No h_data is set; setting default h_data=1G (if this value is too small, the job will fail)
[c177-t0@n2188 ~]$
Notice that the identifier next yo your username change from
[c177-t0@login1 ~]$ to [c177-t0@n2188 ~]$. This indicates that
you requested a node of 1G of memory for a couple of hours.
Remember you can request more memory and time
by typying qrsh -l h_data=3G,h_rt:12:00:00.
IMPORTANT: Do not run things from your login node [username@login1 ~]$.
The great thing about hoffman is that we don’t need to worrie about installing things. Almost everything you will need for this class is alredy there. Also, by runing things in hoffman you avoid issues related with compatiblity of miscellaneous softwares to specific operation systems (MacOS, Windows,etc.).
To get a list of modules/programs available in hoffman type:
[c177-t0@n2188 ~]$ module av
The module we need is called git. Let’s load this program in our enviroment:
[c177-t0@n2188 ~]$ module load git
Nice! You have sucesfully load git.
When using Git for the first time, you need to provide a user name and email address. This information will be associated with your Git activity. Therefore, any changes pushed to GitHub will include your user name and email address.
Also, whenever you use git in the terminal, Git commands will be written as git verb options. But what is this?
verb is what you want to do and options refers to additional optional information that could be needed for verb. With this in mind, here is how you will set up your
name and email adress in the terminal:
[c177-t0@n2188 ~]$ git config --global user.name "YOUR NAME"
[c177-t0@n2188 ~]$ git config --global user.email "YOUR EMAIL ADDRESS"
Check that everything worked fine
[c177-t0@n2188 ~]$ git config --list
user.name=dechavezv
user.email=dechavezv@ucla.edu
Once Git has been configurated, we can start using it.
To start using Git. Create a new folder called “eeb-177” and navigate to it.
[c177-t0@n2188 ~]$ mkdir eeb-177
[c177-t0@n2188 ~]$ cd eeb-177
Note: some of you may have done this step already if you were following along in lecture:
Make sure you’re in the eeb-177 directory.
[c177-t0@n2188 ~]$ pwd
/u/home/class/c177/c177-t0/eeb-177
If you are not in eeb-177, navigate to this directory with cd.
Remember:c177-t0 is Daniel’s user name you should navigate to a path with your own username.
Before we do anything, we need to tell Git to make the eeb-177 folder a repository. This will be the place were Git will store all changes we make.
[c177-t0@n2188 ~]$ git init
This will created a hidden directory within eeb-177 called .git:
ls -a
. .. .git
Note:It is important that you use ls couple with -a. Otherwise, you will not see the hidden directory
that was just created.
Now that we have sucesfully initialized Git, we can start adding things into our directory.
It is good practice to initialize each git folder with a README file.
[c177-t0@n2188 ~]$ touch README.txt
Verify that your file was created
[c177-t0@n2188 ~]$ ls
README.txt
We’ll use nano to edit the README file;
you can use whatever editor you like.
For a more options on text editors, check out this “site”.
[c177-t0@n2188 ~]$ nano README.txt
Type the text below into the README.txt file:
In-class exercise and HW for eeb-177
Verify that the above information was store into the README file.
[c177-t0@n2188 ~]$ cat README.txt
In-class exercise and HW for eeb-177
Now, let’s create a file called Favorite_animal.txt that contains some notes
about your favorite animal.
[c177-t0@n2188 ~]$ touch Favorite_animal.txt
Use nano to edit the file you just created.
[c177-t0@n2188 ~]$ nano Favorite_animal.txt
Type the text below into the Favorite_animal file. Change “African wild dog” with the name of your favorite animal:
My favorite animal is the African wild dog
Favorite_animal.txt now contains a single line, which we can see by running:
[c177-t0@n2188 ~]$ cat Favorite_animal.txt
My favorite animal is the African wild dog
Git alredy notice that we created some files called “favorite_animal” and “README”. However, you will notice some information that tells you that git isn’t keeping track of our files (“nothing added to commit but..”).
[c177-t0@n2188 ~]$ git status
On branch master

Initial commit

Untracked files:
   (use "git add <file>..." to include in what will be committed)

	Favorite_animal.txt
	README.txt
nothing added to commit but untracked files present (use "git add" to track)
We use git add to tell Git about the files we want to keep track of:
[c177-t0@n2188 ~]$ git add Favorite_animal.txt
[c177-t0@n2188 ~]$ git add README.txt
Note: Instead of typing git add twices for each file,
you can type git add . to tell Git to keep track of everyithing inside the eeb-177/ folder.
Now we can use git status again to verify that git is keeping track of things.
[c177-t0@n2188 ~]$ git status
On branch master

Initial commit

Changes to be committed:
  (use "git rm --cached <file>..." to unstage)

	new file:   Favorite_animal.txt
	new file:   README.txt
Git now knows that has to keep track of Favorite_animal.txt and README.txt,
but it hasn’t recorded these changes to our local repository .git.
To save our changes as a commit we need to run one more command:
[c177-t0@n2188 ~]$ git commit -m "My favorite animal"
[master (root-commit) b9ca9a3] My favorite animal
 2 files changed, 2 insertions(+)
 create mode 100644 Favorite_animal.txt
 create mode 100644 README.txt
When we run git add before, we told Git about the files we created within the eeb-177 directory. Now
when using git commit -m Git will store a copy of those files permanently inside the special .git directory.
The option -m stands for “message” and should be a short comment that will help
us remember later on what we did and why.
Now suppose your partner (e.g student sitting next to you) adds more information to the Favorite_animal file.
(Again, we’ll edit with nano and then cat the file to show its contents)
[c177-t0@n2188 ~]$ nano Favorite_animal.txt
Add the text below into the Favorite_animal.txt file. Change “Bush dog” with the name of your partner’s favorite animal:
My partner's favorite animal is the bush dog.
Verify that the text was added to the file.
[c177-t0@n2188 ~]$ cat Favorite_animal.txt
My favorite animal is the African wild dog.
My partner's favorite animal is the bush dog.
Now we have to use git add to tell Git that we would like to save the new line and
git commit -m to save this change permanently into our local repository .git. But before doing this it’s a good idea to review our
changes:
[c177-t0@n2188 ~]$ git diff
diff --git a/Favorite_animal.txt b/Favorite_animal.txt
index b9c0669..c48b2ee 100644
--- a/Favorite_animal.txt
+++ b/Favorite_animal.txt
@@ -1 +1,2 @@
 My favorite animal is the African wild dog
+My partner's favorite animal is the bush dog
The + sing in the last line shows the line we added
Now that we have reviewed our change, it’s time to add it and commit it:
[c177-t0@n2188 ~]$ git add Favorite_animal.txt
[c177-t0@n2188 ~]$ git commit -m "Partner's favorite animal"
[master 5984149] Partner's favorite animal
 1 file changed, 1 insertion(+)
Congrats! You have created your first verstion control!!
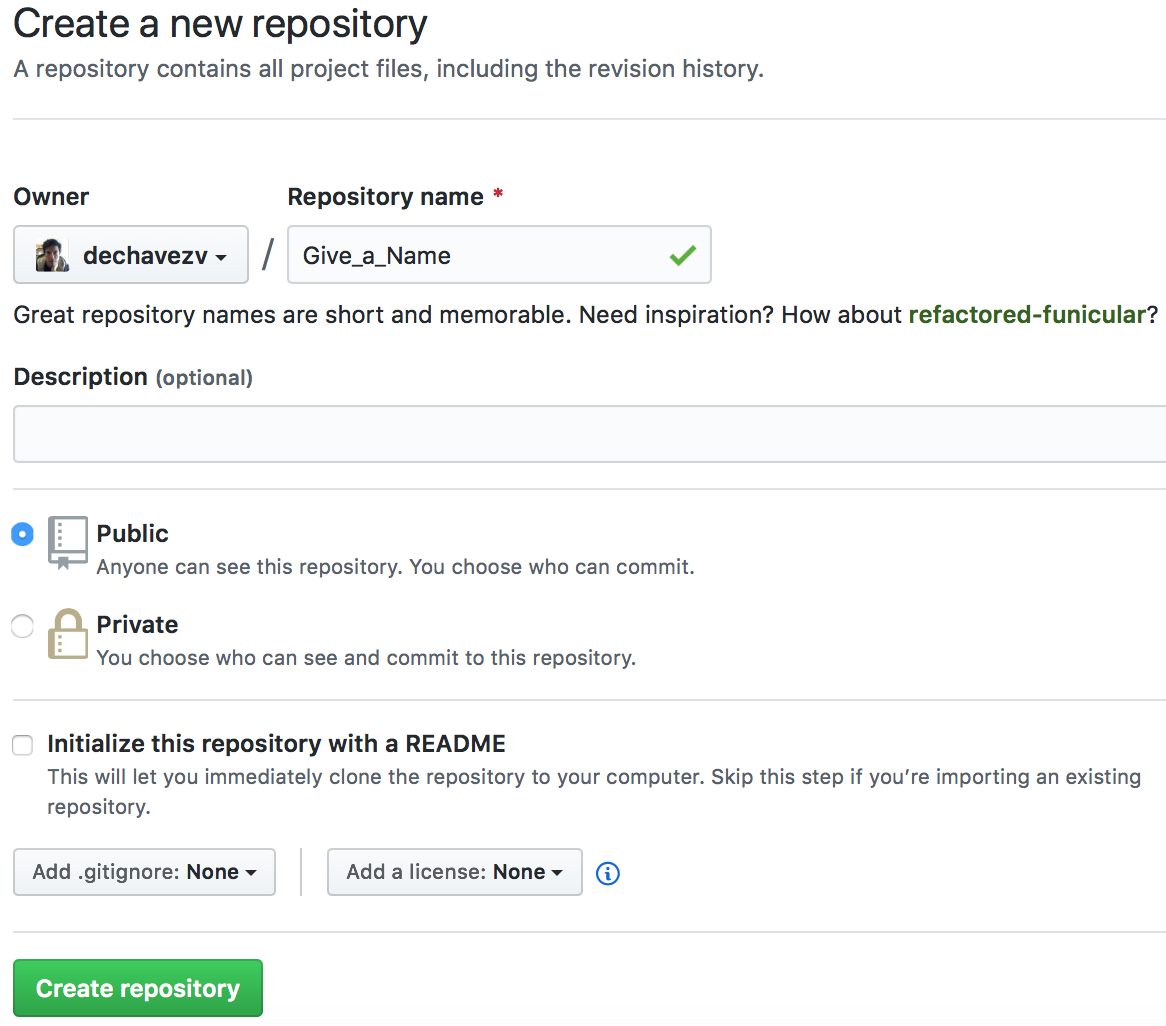
Now, Let’s pretend you want to share this document with the world, so more people can add their favorite animal. Log in to GitHub, then click on the icon in the top right corner to create a new repository:

Give your repository an apropiate name (‘DO NOT called it Give_a_name’) for this course and then click “Create Repository”:
As soon as the repository is created, GitHub displays a page with a URL and some information on how to configure your local repository. Here is an an exmaple of Daniel’s repository:
!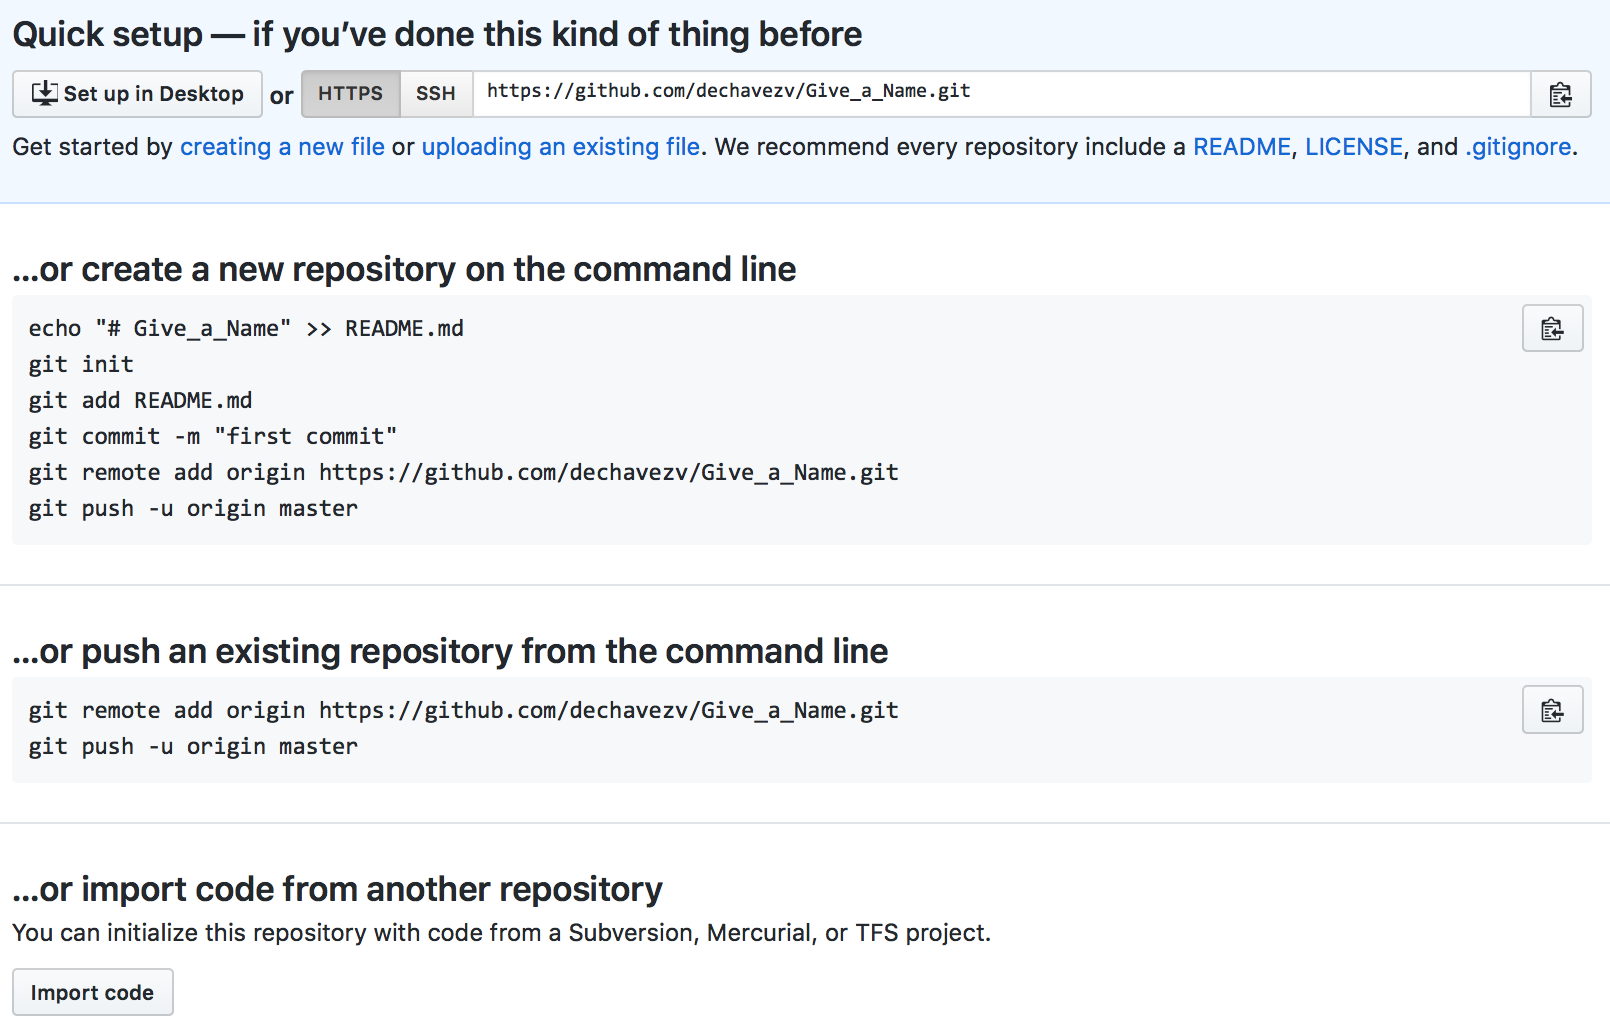
On the top under “Quick setup”,
make sure that “HTTPS” is selected- not “SSH”. Copy the code under
“…or push an existing repository from the command line”,
return to the terminal, and paste in the two lines.
Note: We use HTTPS here because it does not require
additional configuration. After this class you may want to
set up SSH access, which is a bit more secure. You can find
information on how to do this here.
Your terminal should have something like this. Please, DO NOT paste the code above, it’s from Daniel’s repository and wornt work for you.
[c177-t0@n2188 ~]$ git remote add origin https://github.com/dechavezv/Give_a_Name.git
[c177-t0@n2188 ~]$ git push -u origin master
You will be ask for your user name and password.
Username for 'https://github.com': dechavezv
Password for 'https://dechavezv@github.com':
Counting objects: 7, done.
Delta compression using up to 8 threads.
Compressing objects: 100% (5/5), done.
Writing objects: 100% (7/7), 650 bytes | 0 bytes/s, done.
Total 7 (delta 0), reused 0 (delta 0)
To https://github.com/dechavezv/Give_a_Name.git
 * [new branch]      master -> master
Branch master set up to track remote branch master from origin.
Go to your repository on github. It should contain the folder your create with the Favorite_animal and README files. Congratulations!!!
Optional: You will notice that every time you type
git push. You are being ask for your user name and password.
To avoid this, you can store your credentials temprarely temporarily.
Let store to store your credentials for one hour.
Run the following two commands in your terminal to store your credentials for one hour (i.e. you will have to enter your username/pwd once every hour):
Set git to use the credential memory cache:
[c177-t0@n2188 ~]$ git config --global credential.helper cache
Set the cache to timeout after 1 hour (setting is in seconds):
[c177-t0@n2188 ~]$ git config --global credential.helper 'cache --timeout=3600'
Lastly, we will clone a repository into your eeb-177 directory in hoffman.
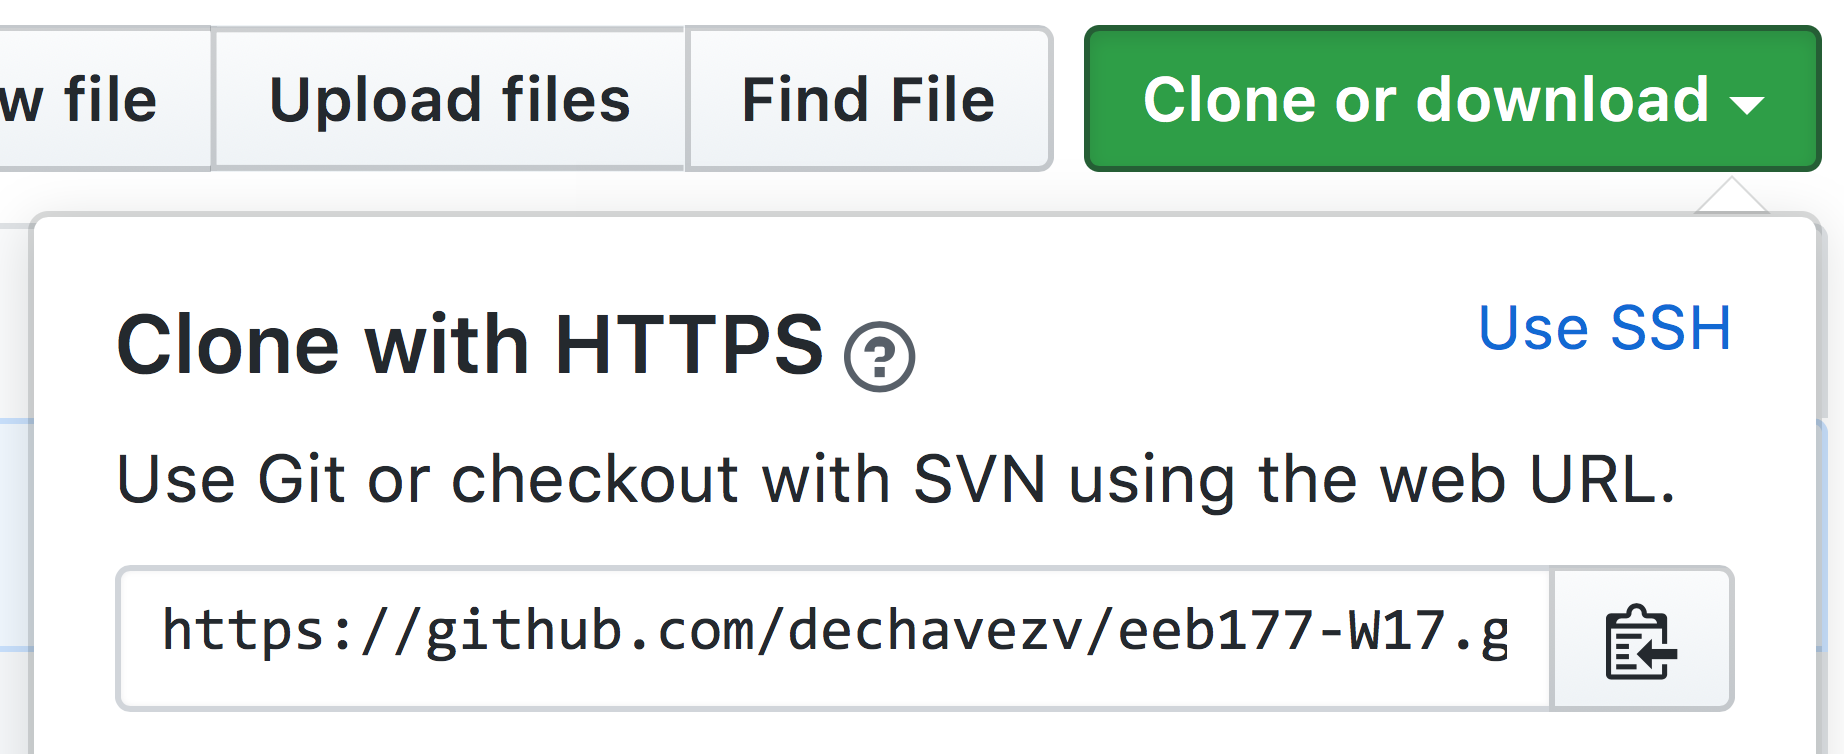
In your browser, navigate to Daniel’s repository https://github.com/dechavezv/eeb-177-Discussion
Once on the main page of the repository, click on Clone or download. Then,under the Clone with HTTPs section, copy the URL for the repository.
Go back to the terminal and make sure that you are in
you eeb-177 directory with pwd. Then,
type git clone, and then paste the URL you copied in the previous step.
[c177-t0@n2188 ~]$ git clone https://github.com/dechavezv/eeb-177-Discussion.git
Press Enter. Your local clone will be created.
Cloning into 'eeb-177-Discussion'...
remote: Enumerating objects: 3, done.
remote: Counting objects: 100% (3/3), done.
remote: Compressing objects: 100% (3/3), done.
remote: Total 3 (delta 0), reused 3 (delta 0), pack-reused 0
Unpacking objects: 100% (3/3), done.
Checking connectivity... done.
Copy the document within eeb-177-Discussion called W1-Discussion-In-class
into your current directory and
with nano answer the questions of the document.
[c177-t0@n2188 ~] $ cp eeb-177-Discussion/W1-Discussion-In-class.txt ./
[c177-t0@n2188 ~] $ nano W1-Discussion-In-class.txt
To avoid confusion in future when cloning things, we will erase the folder eeb-177-Discussion for now.
[c177-t0@n2188 ~] $ rm -rf eeb-177-Discussion
Once, you have answerd the questions of the W1-Discussion-In-class.txt document
add, commit and push the changes to your repository.
$ git add W1-Discussion-In-class.txt
$ git commit -m 'In-class-activity-W1'
$ git push -u origin master
Go to your repository on github. It should contain the new file W1-Discussion-In-class with your answers.
Copy the URL for your repository and email it to Daniel at dechavezv@ucla.edu.
So far you have learn how to keep track of changes made in your directory with git init and
git git add , how to save those changes with git commit and share those changes with the world with git push.
Also you learned how to clone a repository available online, modified information and add it to your own repository.
Git Challenge !!!
- Clone another student repository.
- Create a file that contains interesting facts about the student favorite animals. You can give it whater name you want.
- Push the new document to the Owners (student) repository.
Hint: You cloned Daniel’s repository but instead of pushing the modified information to Daniel’s repository you copied the file into your folder, changed it and push it to your own repository. How would you push your changes to Daniel’s repository? Use the solution to conduct step 3 above.
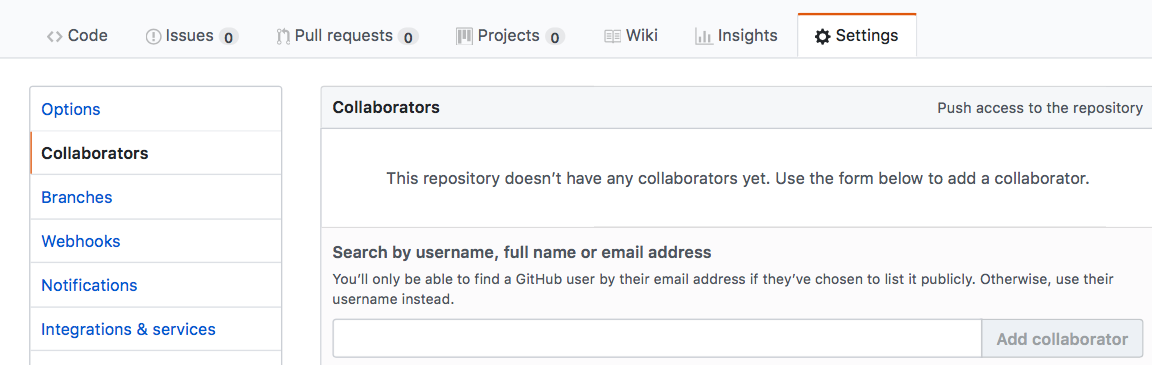
IMPORTANT: Before pushing things to the student repository, the owner of the repository needs to give you Collaborator access. On GitHub, the owner should click the settings button on the right, then select Collaborators, and enter your username. Tell the student to delete permisions once your done with the challenge.
To accept access to the Owner’s repo, you need to go to https://github.com/notifications. Once there you can accept access to the Owner’s repo.
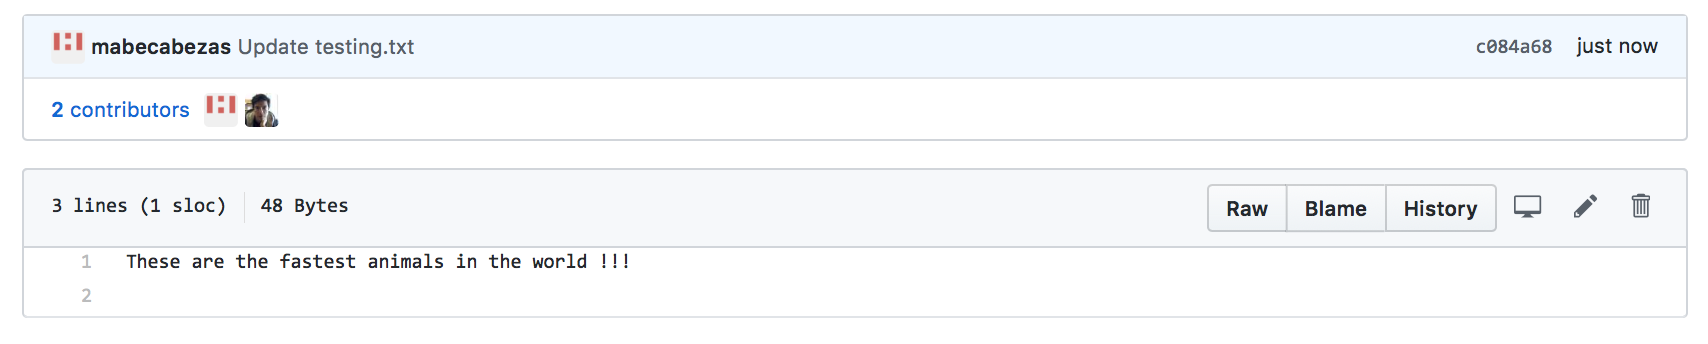
Once you are done with the challenge take a screenshoot to show the file that you added and proof of collaboration. Email this to Daniel dechavezv@ucla.edu.
You should send something like this: